Some call it pixel art, a chosen few may call it index painting. Ether way there are some cool tricks to painting with pixels.
This tutorial was originally made by the video game artist Dan Fessler. You can read the original tutorial here.
First of all you need to have Photoshop installed, I think this technique works with all versions of the program.
Download this Dither Pattern made by Dan Fessler
If you want to make a Game Boy Classic type of pixel art, download this gradient.
When you download either files, just double click the pattern/gradient to install it to photoshop. Even if it does not look like anything happened, it should be installed.
If you want to see how it works; you can start off with a small rectangular selection then add a gradient adjustment layer.
Instead if your painting skills are not up to par and you just want to make something pixelated, you can use this cute cat picture I found. If you have a picture already, shrink it down to under 500 pixels (if it is not already). It is best if it is small because hi res TVs did not exist in the Super Nintendo and Game Boy Classic age. If it is small, you can see the pixelation more clearly.
Assuming you do not have a picture already, copy, create a new document then paste the kitty picture to Photoshop.
Now add these adjustment layers in order: a gradient map, posterize, black and white and lastly the pattern with the Dither Name "Dither_25/50/75_Less". I think this one works best. It looks like the pattern fill icon in the picture below.
Optionally you can add a levels and curves adjustment layer then click on the auto button. It made the kitty's eyes stand out.
When you are done, it should look like this. ↓
If you want to paint with indexed colors, select the eyedropper tool and change the sample pull down menu then change it to "Current and Below". This way you will not select the colors of the final output but the hues that make the colors.
Also if you think about it, is pixel art the new age pointillism?
A tutorial blog that keeps out the fluff and straight to the point with lots of pictures. Sometimes a video tutorial as well
Showing posts with label derp tutorials. Show all posts
Sunday, November 23, 2014
Tuesday, September 30, 2014
How to Create DDS Pictures with Perfect Alpha
The exe will automatically place the plugins into Photoshop so you do not have to worry about where to put them.
DDS files are video game textures, but how to get one with a perfect alpha is the real trick.
Let us use this picture of Twilight Sparkle. You can use a different picture if you like. Download and save it. Since this picture has an alpha already, copy pasting the image will not work as the alpha will show up black.
Open the picture in Photoshop (I am using CC)
Use the eyedropper to sample the ink-lines on her body.
Create a solid color adjustment layer behind Twilight.
It is best to not use the paint bucket tool to fill the same layer as Twilight or a separate layer. I find it works best if you keep the layer with Twilight transparent and a solid color adjustment layer separate. If you use the solid color adjustment layer, you will not have to use the paint bucket over and over again if you need to expand the canvas.
Select crop then change it to an image size that is the power of two. Most video game programs like textures that are the power of two. So common texture sizes are 256X256px and 512X512px. So lets do 256X256px.
Fit Twilight in the crop box and commit the change. If you have Photoshop CC, selecting the W x H Resolution will constrain the crop box to that shape. CS6 or later, you may need to hold Ctrl+Shift+Left Click to constrain it to that shape. (I forget if that is right, comment if I am wrong.)
With the Twilight layer selected, control click the layer icon. A marquee (marching ants) will trace around Twilight.
Go to channels, click on save selection as a channel.
Check out how you did by trying to save it as a dds file. Choose where to save it now, you can overwrite it later if you are not happy with the results.
Click on the "Preview Options" button.
Click on "Background Color".
Select a bright, vivid color like red. You can make the background black but not white. White will just make it hard to see the edges of the texture you are trying to save. Click OK.
Click on the pull down menu button then select "DXT3 ARGB 8bpp | explicit alpha"*
Then click on 3D Preview.
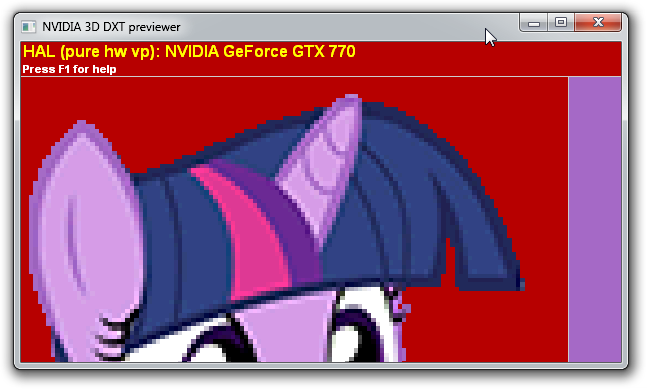
In four rows of two, example pictures show what the picture will look like in different graphics settings. You will often get two pictures without alpha. Do not worry about it.
Holding down left click while moving the mouse will twist and rotate the pictures around, holding the middle mouse button down (not rolling down) will zoom in by sliding the mouse forward or zooming out by sliding the mouse back. Holding down right click will move the pictures around. Try zooming into the bottom right picture.
↑Left click and moving mouse↑
↑Middle click and moving mouse↑
↑Right click and moving mouse↑
If you are happy with the results, close the preview window then save it.
Now you are done if we only want the result in the bottom left. I have not figured out how to get the textures with no alpha to be transparent. If you happen to know how to get those to have an alpha, leave a comment below.
You can go to the next level by making it perfect. If you look at the picture second from the top left, next to the picture with no alpha, you can see bright purple edges on Twilight's mane and tail. To fix that, follow the steps below. ↓
Control click the Twilight layer icon.
Go to the select menu > modify > expand, then type in 1.
With the brush tool, alt click the ink lines on Twilight's mane.
Create a new layer between the solid color adjustment layer and Twilight. Brush the outer transparent edges along Twilight's mane and tail.
Do a 3D Preview again then zoom into the second from the top left corner image. Now the edges of Twilight's mane and tail have now have dark purple edges. If anyone knows a faster way to do this, let me know in the comments.
↑Before↑
↑After↑
Thursday, September 18, 2014
Photoshop Image Generator Tricks
If you have any questions regarding the tutorial, feel free to leave a comment.
Saturday, September 13, 2014
How to make Nit Pick's Guacamole
This is my recipe for guacamole, you can adjust accordingly if need be.
What you need:
- 1 small avocado
- Optional: 1 Cocktail Tomato (looks like a regular tomato but larger than a grape and a lot smaller than a regular tomato)
- Smoked Paprika
- Cayenne Pepper
- Garlic Powder
- Molly McButter or Powdered Butter
- Salt and Pepper
- Knife, spoon, fork and a bowl
- Optional: Steak burger seasoning
Cut along the whole avocado length wise, twist the avocado along the edges where you cut.
If you do not want tomatoes, you can skip the tomato preparation.
Cut the tomato on it's side
Gut the tomato's seeds with a spoon.
Tomatoes are easier and less messy to dice after when you do.
These are the particular brands of ingredients that I use.
When I say 'taps' as a measurement, it is a good medium pressure tap on the shaker. If the shaker pours out too much or too little; adjust accordingly.
5 one second squirts of lime juice
5 taps of paprika
3 taps of Molly Mcbutter
3 turns of a pepper grinder or pinches of ground pepper
3 taps worth of cayenne pepper
Optional: 2-3 taps of steak burger seasoning
2-3 taps of garlic powder
A pinch of salt
When I say 'taps' as a measurement, it is a good medium pressure tap on the shaker. If the shaker pours out too much or too little; adjust accordingly.
5 one second squirts of lime juice
5 taps of paprika
3 taps of Molly Mcbutter
3 turns of a pepper grinder or pinches of ground pepper
3 taps worth of cayenne pepper
Optional: 2-3 taps of steak burger seasoning
2-3 taps of garlic powder
A pinch of salt
Sunday, September 7, 2014
How to Make a Good Video Tutorial
For the free budget:
Stuff you need
- Camstudio to record
- Microphone or Notepad
- Windows Movie Maker (or Macintosh equivalents) and Audacity or other free audio editing programs.
Camstudio is a freeware screen recorder. When running the installation file from the zip file, it will try to trick you into installing things that you do not need. Click the first button that says 'next' in the installer, then click on every 'decline' button and it will start installing only Camstudio. It will install on the default path (usually the C drive or where you installed your Operating System of choice).
Install Audacity, it's for fixing and leveling the audio of your recording.
A good microphone is important but all microphones distort when you say p or w words when you talk into it, an easy fix is to not directly into it. Do some test recordings to see if the audio is loud enough when you talk away from it. You can fix it after.
It helps if you know the program. So write the steps down to complete the task in your tutorial. Cross compare other people's tutorials to see if they have the same idea. It is up to you if you want an intro and an outro. If you do not have microphone, you can show the steps on screen that you wrote down. Make sure it is clean and legible.
If you do have a microphone, have a clean recording with no ums, uhs, coughing or throat clearing. Speak slowly and clearly.
SET UP
It is best to set up Camstudio before pressing the record button. Once you launch the program, a little window will pop up showing this. ↓
Click on Options, then Video Settings.
These are good settings for mostly lag free recording. Match the settings then click on OK. Go to options again and check "Record audio from microphone"
Go to Audio Options and click Audio Options for Microphone.
Change the Audio Capture Device to your microphone that you have plugged in. If it is not listed, restart the program.
RECORDING
Have your script and what you are teaching ready to go. Before you press record and start reading the steps; have what you are teaching like a program for example, ready on screen, bring CamStudio up then click on record. Have a bit of extra silent still footage in the beginning and end so you can trim where you start and stop the recording.When you are done recording, go to Windows Movie Maker (if it is not already installed) then click on Add Videos and Photos button.
Drag the edges of the clip that is imported to the beginning and ends where you start and finish talking. When you are done editing, save the movie under "Youtube Settings"
For a small budget:
Litecam HD is $38. It is an easy to use program and has a higher framerate.
The rest of the equipment is pretty much the same.
If you want a good microphone, a Blue Microphone Snowball is a great for a tight budget. Scroll down to "Frequently Bought Together" and buy a pop filter. You can buy the mic and the pop filter together for $50. Everything for $90.
Subscribe to:
Posts (Atom)


_2014-09-30_21-37-00.png)


_2014-09-30_21-48-38.png)
_2014-09-30_21-39-45.png)




.jpg)


